Machine Events
 |
This article may need cleanup to meet quality standards.
Please help improve this if you can. The Discussion page may contain suggestions. |
Please help improve this if you can. The Discussion page may contain suggestions.
| “ | Deep Rock Galactic is developing strategic operations all around the planet. The company is worried about some strange mutations affecting the creatures of Hoxxes as well as peculiar crystals interfering with scanners and other devices in orbit. To eradicate the threat or simply to take samples, these operations require expert dwarven action to be finalized. If you stumble upon one, give it a go and hope that the reward is worth the risk! |
Introduced in Update 26: Endgame - Part 2, Machine Events are random events that can spawn inside normal Missions, providing a challenging interaction. Machine Events reward players with Credits and Experience, as well as either a Weapon Overclock or a Matrix Core Cosmetic if they own a ![]() Blank Matrix Core, acquired during the first stages of a Deep Dive, Promotions (for every promotion after the first one), and special Weekly Assignments.
Blank Matrix Core, acquired during the first stages of a Deep Dive, Promotions (for every promotion after the first one), and special Weekly Assignments.
To activate the event, a player must own a Tritilyte Key — a reusable item that is automatically provided when a player promotes their first Dwarf — and put it into the Core Infuser. Then, they will be able to press four buttons around the main event structure. Once all buttons have been pushed, the Machine Event will start, a countdown timer set to 180 seconds (3 minutes) will appear. The player(s) must complete the event within that time, or it will fail, making the Core Infuser unusable for their ![]() Blank Matrix Core.
Blank Matrix Core.
Note that the extra experience is awarded when a Machine Event timer runs out, regardless of how players perform.
Spawning
Machine Event's spawn chance is based on Mission Scale, which is a value set for each mission type and variation, check the table below for the values:
| Mission Scale | Spawn Chance | Mission Type | |||
|---|---|---|---|---|---|
| 0.7 | 15.4% | ||||
| 1 | 22% | ||||
| 1.1 | 22.5% | ||||
| 1.2 | 23% | ||||
| 1.3 | 23.5% | ||||
| 1.4 | 24% | ||||
| 1.5 | 24.5% | ||||
| 1.6 | 25% | ||||
| 1.7 | 25.5% | ||||
| 1.8 | 26% | ||||
| 2 | 27% | ||||
Events
Ebonite Mutation
| “ | Miners, a wave of heavily armored Ebonite Glyphids are approaching on a direct intercept vector. Be advised: Conventional weapons will be ineffective - stick to your trusty Pick Axes for this one! |
| — Mission Control |

The Ebonite Mutation event will deploy an Overcharge Sprinkler that will assist Dwarves in dealing with an oncoming wave of Ebonite Glyphids. The machine will periodically spit out blue glowing canisters that can be picked up by running over it. This will grant Dwarves a temporary buff which greatly reduces their Power Attack cooldown. Ebonite creatures can only be damaged by melee attacks (including Impact Axes and Reinforced Power Drills) and frozen. They can be taken down with 1-2 power attacks.
• The objective is to kill enough Ebonite Glyphids to reach the points necessary in the allotted time, with Ebonite Grunts giving 1 point and Ebonite Praetorians giving 2 points.
| Total points required | ||
|---|---|---|
| Player Count | 15 | |
| 25 | ||
| 30 | ||
| 40 | ||
Kursite Infection
| “ | Analysis Engine activated! Kursite infected enemies are being lured to your location! Harvest them for volatile Kursite samples and stick 'em in the machine! R&D are very interested in getting their hands on them. |
| — Mission Control |

The Kursite Infection event will deploy a Kursite Grinder to analyze the infection carried by certain enemies. These enemies are modified with blue skin and yellow crystals and drop Kursite samples when they die, which decay shortly after the creature is killed. Once the Kursite sample is dropped from an infected enemy, a player must deliver it to the analyzer.
• Only one type of infected variant will spawn and the objective is to collect a certain amount of Kursite in the allotted time.
| Kursite Samples required | ||||
|---|---|---|---|---|
| Variant | Glyphid Acid Spitter | Glyphid Praetorian | Mactera Spawn | |
| Player Count | 6 | 4 | 6 | |
| 12 | 8 | 13 | ||

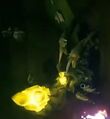
Kursite-infected Acid Spitter on the wall


Omen Modular Exterminator
| “ | R&D came up with a brilliant idea for helping out our Pest Control teams: Project Omen - a vast network of interlinked Modular Extermination Towers, strategically inserted into caves all over Hoxxes. However, much to their regret, the Exterminators turned out to be just as dangerous to our own people as the bugs they were supposed to protect us against! So, the strategy is clear: Project Omen needs to be shut down. However… for security reasons, that can only be done through a… hands-on approach, by our esteemed ground teams. Get in there, find and activate the Exterminator, engage the Maintenance Pads to expose the machine Cooling Tanks, and blow them to bits. Easy. Well, and you have to do so within a limited time window or the device goes into Lockdown. PS: Do note, the Exterminators can be constructed from a variety of different modules, so for your personal safety, do take care to learn the patterns of each. R&D aren’t in the business of making kids’ toys, after all... |
| — Official Description |

The Omen Modular Exterminator event will deploy a hostile Modular Extermination Tower which needs to be destroyed by exposing and shooting its green-colored cooling tanks. To expose these tanks, players will be required to stand on top of three different maintenance platforms around the tower until authorization is granted. Each platform will expose a different module's cooling tanks, which will be indicated in a pop-up display. Note that each module contains multiple cooling tanks that each share an equal portion of it's health.
• The objective is to destroy all the cooling tanks on the Modular Extermination Tower in the allotted time.
The platforms are always linked to the same module of the tower. When standing on the Core Infuser:
- The left and right maintenance platforms will randomly open the middle or top module.
- The opposite maintenance platform is always linked to the bottom module of the tower.
The health of each cooling tank is the same, the module’s health will depend on the number of cooling tanks it has (2 or 3), each cooling tank having a base health of 600.
| Effective
Health Scaling |
Hazard Level | ||||||||||||
|---|---|---|---|---|---|---|---|---|---|---|---|---|---|
| Normal Mission | DD | EDD | |||||||||||
| 1 | 2 | 3 | 4 | 5 | 3 | 3.5 | 4.5 | 5 | 5.5 | ||||
| Player Count | 120 | 180 | 240 | 360 | 360 | N/A | N/A | N/A | N/A | N/A | |||
| 240 | 240 | 300 | 420 | 420 | N/A | N/A | N/A | N/A | N/A | ||||
| 360 | 420 | 540 | 540 | 600 | N/A | N/A | N/A | N/A | N/A | ||||
| 480 | 540 | 720 | 960 | 960 | N/A | N/A | N/A | N/A | N/A | ||||
The cooling tanks are weakpoints with a multiplier of ×1 (so weapons with weakpoint damage do more damage to them).
The Omen Modular Exterminator also has a 70% resistance to explosion, fire and frost damage.
Each tower consists of 3 stacked modules chosen from the following:
- The Drone Replicator (3 cooling tanks) will periodically deploy slow-moving drones that will home in on a player. These drones will explode and deal high damage upon coming in contact with any solid object or creature. They can be difficult to spot, but can be easily destroyed with ranged weapons. The tower will have at least one active drone out at all times, and spawn a new one if none are active. Drones will launch every 6 seconds, regardless of if the previously launched drone has exploded or not. If a drone does not explode 10 seconds after selecting its target, it will fly off in the direction it is facing.
- The Heavy Burster (3 cooling tanks) will slowly rotate in a chosen direction, emitting a red targeting light. If the light passes over a player, a machine gun will begin firing on them, dealing severe damage. Moving out of the light will stop the machine gun from firing.
- The Twin Slicer (2 cooling tanks) lasers will periodically perform sweeps around the tower at varying heights. These lasers can be avoided rather easily, as they may not be pointing towards the ground most of the time.
- The Radial Pulse-Gun (3 cooling tanks) is always at the bottom layer of the tower. Once per second, the module will rotate and then fire. It will send out slow-moving purple beams at waist-level, which will deal extreme damage when touched. The beams can be avoided by dodging, jumping over them, or hiding behind a solid object. An Engineer can also place platforms on top of the maintenance platforms to elevate the players above the beams. Due to the large area it covers and the amount of damage each beam causes, this module must be taken out in priority in order to ease the exposition of the other modules' cooling tanks.
This event is often claimed to be the hardest of the 4 Machine events, especially due to the large amount of dangerous attacks deployed by each module. Prediction and awareness is the key to succeed. Each dwarf will perform more or less against this particular event:
- The Driller will struggle the most when it comes to dealing damages to the cooling tanks, since the Omen Modular Exterminator has a 70% resistance to explosion, fire and frost damage, all three akin to the Driller's CRSPR Flamethrower, Cryo Cannon and Satchel Charge, the latter however is still powerful enough to deal a considerate amount of damage to the Radial Pulse-Gun. On the other hand, his Reinforced Power Drills can allow him to dig trenches, giving cover to the team.
- The Engineer is relatively efficient, with good damage overall and the potential to use elevated platforms to help the team avoid the Radial Pulse-Gun's beams while holding their position on the maintenance platforms. Molly can also be used to measure Engineer's platforms, as placing them right above her (with the bottom of platforms not clipping into her), and connected to a wall, will allow them to remain in the air relatively damage free from the pulse-gun and still allow the dwarf on top to safely access the maintenance platform. His turrets are also efficient against flying drones and to add additional fire power against the cooling tanks.
- The Gunner, with the help of his Shield Generator, can allow him to hold position on one of the maintenance platforms with little trouble and revive downed teammates safely. His high damage weapons, be they primary or secondary, can also dispatch the cooling tanks quickly.
- The Scout, thanks to the accuracy of his primary weapons, can take out the cooling tanks just as efficiently as the Gunner can. His lack of defensive capabilities however, forces him to rely on hit and run tactics.
- The M.U.L.E can be parked on top of the maintenance platforms and be stood upon to avoid the waves from the pulse-gun. The dwarf standing on Molly can still access the maintenance platform. A Resupply Pod can be called to the same effect, assuming sufficient terrain exists 'within' the platform to place the targeting beacon. Engineer platforms can be placed to substitute a lack of terrain.
Drone Replicator
Heavy Burster
Twin Slicer
Radial Pulse-Gun
Tritilyte Crystal
| “ | Well, well! A Tritilyte deposit! We thought we'd lost this one! As you can see, previous teams tried getting through the outer shell of this thing, but failed. We're sending in a Nanite Bomb Dispenser for you - if those can't penetrate it, nothing will. |
| — Mission Control |

The Tritilyte Crystal event will have Mission Control drop a Nanite Bomb Dispenser nearby, which dispenses special explosive charges filled with Nanite explosives. These charges must be picked up, carried to the crystal, and thrown at it until it is destroyed. They are considered heavy objects, so players will be defenseless while carrying it. The charges will blow up upon hitting the surface of the deposit, hitting an enemy, or when shot.
• The objective is to destroy the Tritilyte Shard with Nanite bombs in the allotted time.
Nanite Bombs Damage
- Damage: 100 Nanite
- Maximum Damage Radius: 2m
- Radius: 3m
- Minimum Damage: 50%
- Friendly Fire: 20%
Tritilyte Crystal Health
| Effective
Health Scaling |
Hazard Level | ||||||||||||
|---|---|---|---|---|---|---|---|---|---|---|---|---|---|
| Normal Mission | |||||||||||||
| 1 | 2 | 3 | 4 | 5 | |||||||||
| Player Count | 315 | 455 | 560 | 700 | 840 | ||||||||
| 385 | 525 | 630 | 700 | 840 | |||||||||
| 490 | 630 | 700 | 840 | 980 | |||||||||
| 595 | 700 | 770 | 910 | 1050 | |||||||||
- The Tritilyte Crystal can only be damaged by Nanite damage, which is exclusive from the Event's Nanite bombs.
Core Infuser


Players will need a ![]() Blank Matrix Core to be able to receive the reward from the event; these are rewarded by completing the first stages of a Deep Dive, Promotions (for every promotion after the first one), and Weekly Assignments.
Blank Matrix Core to be able to receive the reward from the event; these are rewarded by completing the first stages of a Deep Dive, Promotions (for every promotion after the first one), and Weekly Assignments.
Upon successful completion of the event, the machine in question emits a pulse that deals 2000 explosive damage to all enemies in a 30-meter radius, with no harm to the dwarves.
Each player can insert one ![]() Blank Matrix Core into the Core Infuser (where the Tritilyte Key was originally used to start the event). The player will then be given three reward options, each being either a random class Weapon Overclock or a random class Matrix Core Cosmetic. Only one can be acquired. The blank core is always consumed, regardless of whether or not the player selects one of the rewards. If the player leaves without taking any of the three options, one will be selected randomly, and the player will be informed of the result upon returning to the Space Rig. If all previous rewards are collected, Mineral Containers of 120 crafting resources are instead available. The rewards do not scale with hazard difficulty.
Blank Matrix Core into the Core Infuser (where the Tritilyte Key was originally used to start the event). The player will then be given three reward options, each being either a random class Weapon Overclock or a random class Matrix Core Cosmetic. Only one can be acquired. The blank core is always consumed, regardless of whether or not the player selects one of the rewards. If the player leaves without taking any of the three options, one will be selected randomly, and the player will be informed of the result upon returning to the Space Rig. If all previous rewards are collected, Mineral Containers of 120 crafting resources are instead available. The rewards do not scale with hazard difficulty.
It is possible to know the class and if it is a weapon overclock or a Cosmetic by looking at the class portrait and the background color. A background color of blue and a hammer icon means it is a weapon overclock and a background color of purple and a hat icon means it is a cosmetic.
Completing a Machine Event shows as a completed Mission Objective below the Secondary Objective. Completing a Machine Event also gives a credit and XP bonus upon mission completion. Note that even if the Machine Event's timer runs out before the event is completed, the credit and XP bonus will still be awarded, even if the mission itself is failed.
Like the Lost Pack and Cargo Crate cosmetics, the Machine Event's Overclock rewards cannot be lost if the mission is failed or aborted, or if the player is kicked or disconnected, or even if the game crashes. It can be lost, however, if the player's Internet connection is interrupted before finishing the mission.
Trivia
- A maximum of one machine event of any type can generate per mission, meaning it is impossible to find more than one Core Infuser per mission.
| |||||||||||
| |||||||||||