Industrial Sabotage
Industrial Sabotage is a mission type in Deep Rock Galactic.
| “ | A rival has begun prospecting operations on Hoxxes and Management is furious! We're sending you in to grab whatever samples they're preparing for extraction, destroy their facilites, and show them that Hoxxes is DRG property! |
| — Mission Control |
A rival mining corporation has infiltrated Hoxxes-IV and is extracting data about the planet. The Dwarves are to dismantle their operations, as well as recover any stolen data from their Data Vaults. Disable the Power Stations that power the force field projector protecting the Data Vault by calling in Hacking Pods, establishing connections between the pods and the Power Stations, and defending the hacking pods until the Power Stations are disabled. Once the force field's main power sources have been disabled, all that remains is to fully disable the force field by removing the backup batteries and getting past the Data Vault's extremely dangerous security measure: the Caretaker.
The Industrial Sabotage mission type can be unlocked by any players who complete the new Spec Ops: Sabotage Training assignment.
Power Stations
The Data Vault is protected by a large, impenetrable force field, and the first mission objective is to take down the Power Stations powering the force field. There are two power lines that come out of the force field projector connected to the Data Vault, extending to each of the two Power Stations. Once you find one of the two Power Stations, hold the [INTERACT] key on the Power Station to call down a Hacking Pod. The Hacking Pod's landing location is indicated by a blue blinking hologram.
Once you find the pod, you can collect Transmitter Nodes from the dispenser on the side (similarly to the Nanite Bomb Dispenser). Tossing a node will cause it to attach to the surface it lands on, creating a transmission beam between the pod and the node. A green spherical outline indicates how close the next node must be for nodes to connect, and connections will not be formed if obstructed by terrain. Transmitter Nodes must be placed between the Hacking Pod and the Power Station until a connection is established. Bosco can pick up placed nodes when marked with the Laser Pointer. Once a connection is made, any excessive Transmitter Nodes that do not contribute to the connection line will be destroyed with a harmless explosion. A red button will emerge from the Hacking Pod, and pressing it begins the hacking sequence.
During the hacking sequence, a Hack-C Bot Unit (nicknamed "Hacksy") will emerge from the pod and begin "hacking" on a large terminal, and a large progress bar labelled "Hacking Power Station" will appear to indicate how long you have until the Power Station is disabled. In order for the Hack-C Bot Unit to hack the Power Station, it must be defended from enemy attacks (and damage in general). If enemies are damaging the Hack-C Bot, Mission Control will alert you of the imminent threat. If the Hack-C Bot takes too much damage, it will retreat into the pod and halt all progress (indicated by the progress bar turning dark grey). After a short period of time, the activation button will re-emerge, and pressing it reboots the Hack-C Bot. In addition to protecting the Hack-C Bot from damage, the dwarves must also keep the connection between Hack-C and the Power Station stable; if one or more of the Transmitter Nodes are displaced, Hack-C will retreat into its pod, and the connection line will need to be re-established before hacking continues. Identical to the setup procedure, the node dispenser on Hack-C emerges, and nodes must be repositioned in order to re-establish connection between the pod and the Power Station. Under rare circumstances, should the pod be within range of the Power Station itself, the displaced node will not affect the connection and it will connect directly to the Power Station. Once the hacking sequence is complete, the Power Station will be fully disabled and some of the projector's power will be lost. This procedure is the same for both Power Stations.
The Caretaker
- Main article: Caretaker
Once both Power Stations are disabled, the force field projector will be running on backup power and its batteries must be forcefully removed by holding the [INTERACT] key to eject them from the projector. However, once the force field is disabled, the Caretaker will be activated to defend the Data Vault and must be defeated before the Data Rack can be collected.
The Caretaker boss consists of 3 phases, each phase becoming more difficult as the battle progresses. All phases involve at least three robotic appendages surrounding the vault which will fire a volley of projectiles at you if targeted, strike you with their heads similarly to Stabber Vines, or burrow their heads into the ground and reemerge out of the ground in a different location, an Area Shock special attack that deals heavy electric damage, only activating if you stand too close to the Caretaker, and three blasts of Plasma Barrier Waves that deal some damage and shove you back. The Area Shock and Plasma Barrier Wave attacks are consistent across all phases while the quantity of robotic appendages changes as the battle progresses.
Intake weakpoints on the top corners of the Caretaker will open up at the beginning of every phase which can be damaged to reveal the Caretaker's primary weakpoint. As each intake health bar is depleted, the Caretaker will spin faster making them more difficult to hit. Once all four intake health bars are depleted, one of the four eyes on the Caretaker will open (indicated by a bright red spotlight emitting in front of the eye) which allows you to damage its base health. Once one of its base health bars are depleted, the eye will close and the next phase will begin. The first phase has no special qualities while Phases 2 and 3 will spawn Sniper Turrets and/or Shredders or teleport Phase bombs that detonate after a few seconds in a large AOE. Furthermore, the amount of active robotic appendages increases to four, appendages will be respawned and the eye will close and reopen on different sides of the Caretaker as its base health is depleted. Small shields also rotate around the eye that can block shots once it is open on phases 2 and 3.
Extraction
Once the Caretaker is defeated, it will collapse to the ground and detonate, emitting a large shockwave that knocks back players and damages enemies. The Data Vault will then open up and the Data Rack will emerge on a pedestal. Collect the Data Rack and attach it to the M.U.L.E to complete the primary objective. Once completed, a red button will light up on the M.U.L.E to begin the extraction phase. Once pressed, the Drop Pod will be called in to pick up the M.U.L.E and the Dwarves. It will wait 5 minutes before departing, though the door will only open once the M.U.L.E has been secured.
Cave
Industrial Sabotage caves will start within a small "starter" cave which leads to a primary hub cavern where the Data Vault is located. The force field projector's power lines will branch off towards a secondary hub cavern that branches into two sub-rooms that contain the Power Stations, but the generation of these four caverns is not always consistent and may occur on top of each other. Turrets always spawn in the tunnels leading to the Data Vault, around the Vault and in the tunnels leading to the power station.
Objectives
Primary Objective
- Disable 2 Power Stations
- Shut Down Vault Force Field
- Defeat The Caretaker
- Steal Data Rack
| Length | Complexity | Objective | Primary Payout | Secondary Payout |
|---|---|---|---|---|
| Disable 2 Power Stations | ||||
| Disable 2 Power Stations |
Secondary Objective
|
|
|
Trivia
- This mission type was added in Season 01: Rival Incursion.
- The backup batteries ejected from the force field projector are reskinned Nanite Bombs from the Tritilyte Crystal Machine Event, as they share the same ping inspection lines. Consider relocating them to the ports from which the Rival Robotic Appendages emerge, then shooting them once the fight begins to deal significant damage.
- The Ommoran Heartstone and Data Rack are the only heavy objects that will continue to be visible when deposited in the M.U.L.E, with them being strapped to the top.
- The Hack-C Drone, like the Drilldozer's head, is heavily based off of Bosco's design. Additionally, the Hack-C Drone shares the same nicknaming as BET-C with the C turning into a -sy at the end (BET-C = Betsy, Hack-C = Hacksy).
- Rather amusingly the Hack-C Drone has RGB lights on its back like certain computer models. It also drops soda cans and fast food take out while hacking.
- It is possible to pet Hack-C by pressing the [USE] key on its "body" found mounted behind the keyboard. The bot does not like it.
- Season 02: Rival Escalation was the first time Industrial Sabotage was part of an assigment.
Gallery

The data vault surrounded by the forcefield.
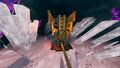
A power station.
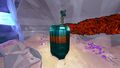
A hacking pod.


| |||||||||||