User:ArsonCat
Abyss Bar test

| “ | No Refunds! No Refills! No Regrets! |
| — Abyss Bar Slogan |
The Abyss Bar is a large section on the main floor of the Space Rig. Here you can have a drink with your fellow dwarves, dance to the tunes on the Jukebox or take rounds trying to kick barrels into the Barrel Hoop.
The Bar
At the Bar, you can order a drink from the robot bartender Lloyd. A price list is visible on the top left corner of the bar and when talking to Lloyd.
Starting from Rank 3, players are able to purchase Beers from the Abyss Bar. Depending on the potency of the drink and how many are consumed, the player's character may become intoxicated. The effects of intoxication include borders of the screen becoming a wavy double-image, the player's view will wobble around randomly and the player's character will move in random directions of their own accord. These effects will become more extreme if the player drinks more Beer, and if too much Beer is consumed in a short amount of time, the player's character will pass out drunk. If alone the player will respawn in the Infirmary, though if other players are present they will need to be revived - similar to losing all of one's health in a Mission. Either way, the player will wake up sober.
It is possible to enter a Mission while intoxicated, though there is no incentive for doing so besides bragging rights. You will not receive a Hazard Bonus for completing a Mission while drunk.
On the bar's counter players can see a small green tipping device called TIP-C (nicknamed "Tipsy")[1], where they may pay ![]() 5 to leave a tip. This has no effect besides triggering a random dwarf voiceline thanking Lloyd. There is additionally a small bobblehead dwarf on the counter that players can interact with to slap around.
5 to leave a tip. This has no effect besides triggering a random dwarf voiceline thanking Lloyd. There is additionally a small bobblehead dwarf on the counter that players can interact with to slap around.
Players who suffer motion sickness are advised to avoid drinking too much, as the effects of being drunk can cause dizziness and nausea. Make sure to drink Leaf Lover's Special to "cure" the effects of intoxication.
Available drinks
| “ | Management reminds all employees that contrary to common belief the available drinks do intoxicate dwarves, do have influence on their ability to walk straight and do possess the potential to knock them out. |
Craftable and special beers will require brewing materials found in missions in the form of collectible plants: ![]() Barley Bulb,
Barley Bulb, ![]() Yeast Cone,
Yeast Cone, ![]() Malt Star and
Malt Star and ![]() Starch Nut.
Starch Nut.
Corporate Issue
These drinks are always available.
- Oily Oaf Brew
- The Oily Oaf. A classic. While one of the lighter drinks available, the rich, buttery aftertaste coupled with the low price tag means the Oaf is here to stay.
 
|
Price | |
| Rank | ||
| Potency | Safe For Work (12%) |
- Glyphid Slammer
- An adventurous mix of a cheap, powerful ale with an equally cheap, powerful energy drink. The result is almost, but not quite, entirely undrinkable. But it sure does put a spring in your step.
 
|
Price | |
| Rank | ||
| Potency | Strong (20%) |
- Leaf Lover's Special
- The Leaf Lover is on this chart entirely to please Management. It'll kill your buzz faster than a pay cut, and leave you with the same empty feeling in your gut. Still, it can be handy on Inspection Day - just don't let anyone know you had one.
 
|
Price | Effect | Removes the Drunk status effect | |
| Rank | ||||
| Potency | Buzzkilling (resets to 0%) |
Holiday Beer
These drinks are only available on certain events and holidays.
- Best Wurst Beer
- Available during Oktoberfest.
A sausage-flavoured brew. Actual food was not within the budget for the celebration, so this was the second best option. Will definitely put some hair on your chest. If you can keep it down...

|
Price | |
| Rank | ||
| Potency | Strong (20%) |
Today's Special
These 8 drinks provide the dwarves with a buff once consumed. Only one of them is sold at a time, the special drink changes upon return to the space rig after a mission ending or a team disbanding.
![]() Beer License required to be paid first to unlock the whole selection:
Beer License required to be paid first to unlock the whole selection: ![]() 1,000 Credits,
1,000 Credits, ![]() 5 Barley Bulb,
5 Barley Bulb, ![]() 10 Yeast Cone,
10 Yeast Cone, ![]() 10 Malt Star,
10 Malt Star, ![]() 15 Starch Nut.
15 Starch Nut.
- Backbreaker Stout
- An invigorating and foamy brew, putting pep and zest in any true-blooded dwarf's blood!
 
|
Price | Effect | ×1.3225 Carry Movement Speed | |
| Rank | ||||
| Potency | Strong (25%) |
- Dark Morkite
- The original DRG-approved brew. Bitter and heady, though not so strong as to incapacitate the workforce.
 
|
Price | Effect | ||
| Rank | ||||
| Potency | Regular (16%) |
- Pots O' Gold
- Pots O' Gold - otherwise known as "Liquid Luck" - has been known to instill any red-blooded dwarf with sharply enhanced senses and an impressive lust for sweet, sweet gold...gold...GOLD! Riches surely await anyone lucky enough partake of this elusive brew.
 
|
Price | Effect | ||
| Rank | ||||
| Potency | Regular (16%) |
| Label | Mug | Name | Buff | Price | Potency | Description | ||
|---|---|---|---|---|---|---|---|---|

|

|
Red Rock Blaster | Max Health |
|
Safe For Work (12%) |
When you absolutely, positively got to kill everything in your path, accept no substitutes. Equal parts prime aged stout, habanero sauce, and military-grade combat stim, the Red Rock Blaster will make you see RED! | ||

|

|
Rocky Mountain |
|
Regular (15%) |
A touch of class. A thinker's drink. Quaffing this heady brew imparts an awesome sense of oneness with the rock around you, letting you carve through it like butter. | |||

|

|
Skull Crusher Ale | Base Pickaxe Damage |
|
Strong (20%) |
The cosmic fury of a thousand raging suns course through this midnight-black, glistening concoction. People ask why we remember Karl. People ask what made him a legend. Rumor has it Skull Crusher Ale is at least partly to blame. Make of that what you will. Beware. | ||

|

|
Slayer Stout | Pickaxe Power Attack Cooldown |
|
Strong (23%) |
A rare and much desired brew. Continuing the millennia-old tradition, this heady ale was imbibed by the strongest, most fiercest, most absolutely rabid dwarves of old before heading into glorious battle seeking an honorable end. Not for the faint of heart. | ||

|

|
Tunnel Rat | Fall Damage (additive) |
|
Safe For Work (10%) |
The Smoothest of brews, known to instill such confidence and grace into even the clumsiest dwarf as to make any sober dwarf blanch. Be warmed: Overconfidence is not covered by the company insurance. |
Note: The effect from the Pots O' Gold only applies to gold mined with a Pickaxe. Gold detached from the walls by Bosco, environmental effects or with a weapon will not be doubled.
Craft(able) Beer
These 14 beers provide fun interactions and effects only in the Space Rig, except the Randoweisser.
- Each of the beers below become available for purchase once you have achieved its required
 player rank.
 - Licenses require paying a sum of
 credits,
 Yeast Cone,
  Malt Star, and
  Starch Nut.
![]() Total Beer License Cost:
Total Beer License Cost: ![]() 10,650 Credits,
10,650 Credits, ![]() 165 Yeast Cone,
165 Yeast Cone, ![]() 196 Malt Star,
196 Malt Star, ![]() 270 Starch Nut
270 Starch Nut
| Label | Mug | Name | Effect | Price | Potency | Beer License Cost / Description | ||||||
|---|---|---|---|---|---|---|---|---|---|---|---|---|

|

|
Arkenstout | A harsh blizzard freezes the player, encasing them in ice. |
|
Safe For Work (10%) |
An ancient recipe going back millenia, tasting of honor, gold, and glory days of yore. Served best chilled to near absolute zero. | ||||||

|

|
Blacklock Lager | The player's screen will darken, followed by ghostly sounds. |
|
Epic (46%) |
An ominous concoction, so thick and black that you'd think it was taken from the very core of Hoxxes itself. Any rumors around psychotic episodes and hallucinations connected to this brew are purely anecdotal. Or so they say... | ||||||

|

|
Blackout Stout | Increases drunkenness to max, causing the player to pass out. |
|
Legendary (100%) |
Renowned through space and time, a tankard of Blackout is enough to knock out almost anyone. A true test for the true drunkard. | ||||||

|

|
Blackreach Blonde | The player receives the Jukebox effect and starts dancing. |
|
Regular (15%) |
The party-goer's choice. Charming, fizzy, and fruity, the Blackreach Blonde is known to put a smile on anyone's face. | ||||||

|

|
Burning Love | The player catches on fire. |
|
Regular (17%) |
What's cooking? Why, YOU are! The Burning Love is famous for its powerful taste and utter disregard for the Scoville Scale. Ingest at your own risk. | ||||||

|

|
Flintlocke's Delight | Explosions occur around the player, propelling them in random directions. |
|
Strong (20%) |
How does it work? Eldritch magic? Genetic tampering? Nobody knows! Suffice to say, Flintlocke's Delight is a favorite of demolitionists everywhere. Also, it tastes great - if you got a love for gunpowder, anyway. | ||||||

|

|
Gut Wrecker | The player releases a loud burp, shaking their screen. |
|
Epic (41%) |
Equal parts carbon dioxide, nitric acid, and maple syrup, the Gut Wrecker is a peculiar but exceptionally tasty brew - if you manage to keep it down, that is. Has been known to be quite fizzy. | ||||||

|

|
Mactera Brew | Player releases a loud fart, creating a green cloud around them. |
|
Epic (40%) |
A delightful, tangy brew. In accordance with DRG's "Don't Ask, Don't Tell"-guidelines, the Mactera Brew quickly rose to prominence among the crew - as long as everyone agreed not to discuss the ingredients... | ||||||

|

|
Malt Rockbearer | The player grows in size. |
|
Strong (23%) |
A classic, malty brew with a distinctive tangy aftertaste, the Rockbearer is known to be behind many great dwarven feats. Be advised: Management will not reimburse any amount of clothes torn or vocal chords ruptured as a result of enjoying this drink. | ||||||

|

|
Randoweisser | The player loadout and cosmetics are randomized. |
|
Safe For Work (--%) |
Effect persist in Mission. | ||||||

|

|
Seasoned Moonrider | The player receives low gravity, and gains an upward boost in momentum. |
|
Safe For Work (12%) |
Malty and sweet, the Seasoned Moonrider is a distinguished brew that's sure to put a kick in your step. | ||||||

|

|
Smart Stout | The player becomes temporarily intelligent and talks like a scientist. |
|
Strong (24%) |
While most drinking has a tendency to slow you down, Smart Stout stands out by doing the opposite. Imbibe enough of this rich, golden nectar and you'll be solving complex orbital insertion equations faster than you can say "This drink, I like it! Another!". How? It's said Science is involved. Somehow. | ||||||

|

|
Underhill Deluxe | The player shrinks in size. |
|
Regular (18%) |
In a hole in the ground, there lived a brewer. Not a nasty, dirty, wet hole, filled with the ends of worms and an oozy smell, nor yet a dry, bare, sandy hole with nothing in it to sit down on or to drink; it was a brewery, and that means beer. This beer, in fact. And it is lovely. | ||||||

|

|
Wormhole Special | Teleports the player to a random location (either inside the Drop Pod or outside the Space Rig.) |
|
Strong (25%) |
There are some breweries out there that will go to any lengths to attract customers. There are dark rumors surrounding the Wormhole Special - dark and ominous as the blackness of space itself - but damn if it ain't tasty even so. Drink with caution and respect. Grasp your knees tightly and close your eyes. It'll be over soon. |
Bonus Drink
These drink variants are available to those who have purchased the respective Supporter Upgrade DLC.
| Label | Mug | Name | Price | Potency | Description | ||||
|---|---|---|---|---|---|---|---|---|---|

|

|
Oily Oaf Brew Supporter II Upgrade |
|
Safe For Work (12%) |
This version of the Oily Oaf Brew is only available for owners of the Supporter II Upgrade.
It is functionally identical to the regular Oily Oaf Brew, but comes in a golden tankard, and replaces the regular Oily Oaf Brew in the bar. | ||||

|

|
Glyphid Slammer Supporter Upgrade |
|
Strong (20%) |
This version of the Glyphid Slammer is only available for owners of the Supporter Upgrade.
It is functionally identical to the regular Glyphid Slammer, but comes in a golden tankard, and replaces the regular Glyphid Slammer in the bar. |
Potency
The potency of the drink will affect the intoxication level of the player, adding to the total, causing different effects after passing certain thresholds. The intoxication level goes down by 1% every 24 seconds.
| Beer | Potency |
|---|---|
| Oily Oaf Brew | 12% |
| Glyphid Slammer | 20% |
| Leaf Lover's Special | Resets to 0% |
| Best Wurst Beer | 20% |
| Backbreaker Stout | 25% |
| Dark Morkite | 16% |
| Pots O' Gold | 16% |
| Red Rock Blaster | 12% |
| Rocky Mountain | 15% |
| Skull Crusher Ale | 20% |
| Tunnel Rat | 10% |
| Arkenstout | 10% |
| Blacklock Lager | 46% |
| Blackreach Blonde | 15% |
| Burning Love | 17% |
| Flintlocke’s Delight | 20% |
| Mactera Brew | 40% |
| Malt Rockbearer | 23% |
| Seasoned Moonrider | 12% |
| Underhill Deluxe | 18% |
| Gut Wrecker | 41% |
| Wormhole Special | 25% |
| Blackout Stout | 100% |
| Smart Stout | 24% |
The effects of intoxication slowly become worse and worse as the player's tolerance is used up. These effect happen roughly at these points:
| Intoxication (%) | Effect |
|---|---|
| 0-25 | Nothing |
| 26-39 | Slightly blurred vision |
| 40-49 | Player begins to stumble around |
| 50-59 | Stumbling worsens, double vision begins to creep towards central vision |
| 60-69 | Vision begins to notably sway |
| 70-89 | Staggering gradually gets worse |
| 90-99 | Random slurred speech begins. Staggering becomes more and more extreme. Vision fully blurred. |
| 100%+ | Erratic movement becomes sharp, player passes out shortly after. |
The Barrel Hoop
The Barrel Hoop mini-game is located at the back of the Abyss Bar.
Players stand behind a barrel which is dispensed from above, and attempt to kick the barrel into a moving hoop that incinerates barrels, beer mugs and dwarves that pass through it. Scores can be reset via the red button to the right of the game. The player will die if they jump into the incinerator hoop, only to respawn in the medbay afterwards. If the player dies while intoxicated, they will receive an achievement.

The Barrel Hoop area from the bottom of the ramp
The Barrel Hoop itself and counter
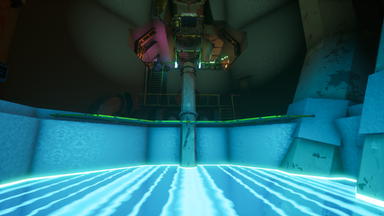
The Barrel Hoop bay


Scoring and point values
The game consists of four phases, with the first phase active while no barrels have been passed through the hoop.
Upon entry of a barrel, points will be awarded according to the table below.
If the hoop bounces off of the left side twice without a barrel being scored, the phase is reset to 1. Missing a barrel also resets the phase to 1.
If a barrel passes through the hoop within the cycle (from left to right to left), the game will progress to the next phase when the hoop touches the left side, capping out at Phase 4 where the point values are multiplied by 4.
The speed of the hoop can change whenever it touches the left side.
| Item | Phase 1 (1x Modifier) | Phase 2 (2x Modifier) | Phase 3 (3x Modifier) | Phase 4 (4x Modifier) |
|---|---|---|---|---|
| Beer Mug | 1 Point | 2 Points | 3 Points | 4 Points |
| Normal Barrel | 10 Points | 20 Points | 30 Points | 40 Points |
| Green Barrel | 10 Points | 20 Points | 30 Points | 40 Points |
| Yellow Barrel | 10 Points | 20 points | 30 Points | 40 Points |
| Red Barrel | 25 Points | 50 Points | 75 Points | 100 Points |
| Forge Hammer | Hammer Time (No Score) | |||
| Forge Toolbox | No Score | |||
| The Space Ball | 3 Points | 3 Points | 3 Points | 3 Points |
| Player | No score (but see Achievements) | |||
First phase has a 1x point modifier, Second phase 2x, Third phase 3x, and 4th phase 4x.
Phases are indicated by the size of the text on the scoreboard located above the moving hoop, although the text size does not increase between phases 3 and 4.
Jetty Boot


Jetty Boot is an arcade machine mini-game located right behind Lloyd, and to the left of the Barrel Hoop mini-game. It costs ![]() 5 to play. The gameplay of Jetty Boot consists of the player controlling a small flying boot and making it jump through gaps in walls of varying heights. Each successful jump through a gap will award a point. After a number of walls have been cleared, the game will progress to the next level, of which there are infinitely many. There are 3 lives in each round of Jetty Boot and 1 life will be subtracted if the boot touches a wall, with 0 lives remaining resulting in a game over. During and after the game the player may view their score compared to both the high score and other scores on a leaderboard.
5 to play. The gameplay of Jetty Boot consists of the player controlling a small flying boot and making it jump through gaps in walls of varying heights. Each successful jump through a gap will award a point. After a number of walls have been cleared, the game will progress to the next level, of which there are infinitely many. There are 3 lives in each round of Jetty Boot and 1 life will be subtracted if the boot touches a wall, with 0 lives remaining resulting in a game over. During and after the game the player may view their score compared to both the high score and other scores on a leaderboard.
Session hosts have access to a button on the right side of the arcade cabinet that will clear all recorded high scores from their instance of the leaderboard. Periodically, the Jetty Boot leaderboard will repopulate with more scores under a number of possible NPC and developer names, which are as follows:
- Bosco
- Lloyd
- MC
- Gravn
- Mekill
- Johan
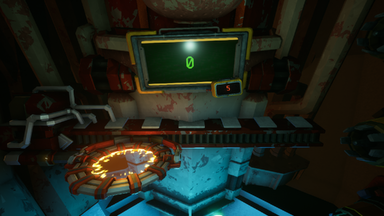
Employee of the Month Screen

Just above and behind the Jukebox is the Employee of the Month Screen.
It shows the current name and profile picture of the Employee of the Month on the Deep Rock Galactic Discord, along with the Discord's current online and total users.
It also randomly shows one of 5 flavor texts:
- Managed to mine 10000 Nitra without using a pickaxe.
- Got a broken back after carrying the entire mission on their shoulders.
- Won a drinking contest against Bosco.
- Forgot to bring ammo to a mission. Highest kill count anyway.
- Secretly knows what the error cube is for. Won't tell anyone.
To-Do
Cosmetic pages overhaul
- Accessory_Shop talks about a whole lot more than just the Accessory shop.
- Accessory_Shop breaks structure halfway through for matrix cores, listing by source-then-slot instead of slot-then-source. Then it goes back to the previous structure for victory moves.
- Pickaxe Customization is a mess without a clear structure.
Grid-based? Types of cosmetics in rows, sources in columns. Intersections show a number of items in that category. Column headers lead to the page of the corresponding source. Each page about a source should ideally have a list of cosmetics that is uniform with the grid-based index. Row headers lead to the corresponding section of the gallery. And yeah, the gallery.
Mission reward calculation chart
List all possible contributors to gold, then all possible contributors to XP, then applicable bonus modifiers, and make it chart-like.
"Interesting facts"
Trawl this to see if there's anything worth adding to various pages that isn't already mentioned.